My $8,000 Cholesterol Device: A Bike Fit Journey
Recent research suggests amateur cyclists can unlock 10-40 watts just by fixing their bike fit. I wasn’t looking for watts. I was looking for a health device that didn’t make my toes go numb by mile 15. Seven saddles later, I finally found the answer—and it wasn’t a saddle.
What followed was a journey through bike fitting science, an $8,000 American-made carbon bike, and a fitting session on a machine that looks like it escaped from a lab. Yes, I hear myself. Here’s what I learned about the three pillars of bike fitting—and why it might save your knees, your toes, and your relationship with cycling.

Why I Needed a Bike Fit (Not Just a New Bike)
My doctor called it a “cholesterol-lowering device.” I called it my escape pod.
At 230 pounds, I wasn’t exactly the target demographic for road cycling—though cycling welcomes all body types. But in my case, the doctor was clear: lose weight or meet statins. I chose pedals over pills. A few months later, I was down to 215. The weight came off. The problems didn’t.
My background was mountain biking. Flat pedals. Cushy saddles. Upright position. Transitioning to road meant SPD pedals, a stretched-out posture, and discomfort I assumed was “just part of cycling.”
I tried fixing it with gear. Seven saddles. Seven failures. Gel seats that felt like sitting on a marshmallow. Finally landed on an SMP Lite 209 and thought I’d solved it. I hadn’t.
The toe numbness persisted. Neck pain from extending forward. Hip discomfort after hour two. Some people fold like lawn chairs. I fold like a filing cabinet.
I spent a year chasing equipment solutions to a position problem. Still, I kept thinking: maybe I just need a better saddle. A different handlebar. New shoes.

Finding Piermont and the Parlee Decision
I visited several local bike shops—some were helpful, but nothing clicked until I walked into Piermont Bicycle Connection.
Sunny was the first person who didn’t immediately try to sell me a bike. We talked about my riding. My discomfort. My goals. Then he said something that shifted everything: “We do bike fitting here as well. Maybe start there?”
In hindsight, obvious concept. Fit the rider before picking the bike.
I scheduled a fitting with Jason for the following week. Used the time to research. That’s when Parlee caught my attention.
Here’s what hooked me: Parlee’s “nude waxed finish.” Many brands use paint for style and protection; Parlee goes exposed to show off the craftsmanship. They’re also American-made—well, frames finished in Portugal, assembled in Massachusetts. American-ish, with Portuguese sun-kissed carbon. Small operation. Family business that’s had a bumpy history but came back stronger.
The practical stuff mattered too. Threaded bottom bracket means less creak and drama. Universal derailleur hanger means any shop can help me. 38mm tire clearance means road to gravel flexibility.
Was I paying a premium? Absolutely. Let me be transparent:
| What You Get | What It Costs | Reality Check |
|---|---|---|
| 830g frame (lightweight) | $8,190 Tier Six build | Entry-level SRAM Rival AXS |
| Monocoque carbon, nude finish | Competitors: $3-4K less for same specs | Paying premium for frame/brand |
| Zipp 303S wheels | Hookless = limited tire choice, 72.5 PSI max | Heavier riders may need more pressure |
| Complete build: 7.8-8.2kg | Heavy for $8K “climbing” bike | Not as light as expected |
I’m not buying a spec sheet. I’m buying a frame I’d be proud to look at in my garage. Yes, vanity played a role. The raw carbon look is beautiful. Supporting a small business feels right. Sometimes that matters more than spreadsheet math.
What Actually Happens in a Professional Bike Fit
Jason Barcoff has an unusual background for a bike fitter. Former EMT. Helicopter crew. The kind of person who stays calm when things go sideways.
The session started with questions. Riding history. Current complaints. Recent injuries. Old riding shoes inspection. I mentioned the toe numbness. He nodded like he’d heard it a thousand times. Probably had.
First came the assessment. Flexibility tests. Stability checks. Range of motion. Jason said something I didn’t expect: “Your body awareness is exceptional.” Which is ironic given how I ride.
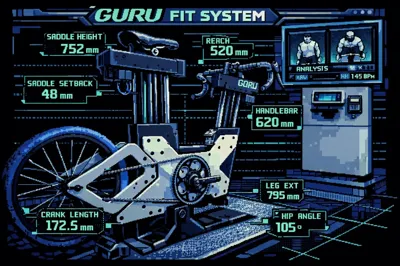
Then came the GURU Dynamic Fit Unit. Imagine a Peloton and a surgical table had a baby. Every measurement is computer-controlled. Real-time adjustments while you’re pedaling. I was skeptical at first, but Jason knew what he was doing and made controlled adjustments.
We started at the feet. Shoe fit. Cleat position. Pedal spindle length. Jason moved the cleats toward the inside of my foot and back toward the heel. First adjustment. Immediate difference.
Then upward. Saddle height. Saddle setback. Saddle tilt. We tested different saddles. Different widths. Different shapes. Landed on a SQ-Lab 611 14. Not the one I would have picked.
The DFU has a trick called Virtual Ride. It simulates grades up to 15%. We tested my position climbing. Descending. Cruising. The machine tilted while I pedaled.
Final third: handlebar reach and drop. We were going for performance fit so narrowed the bars to 380mm. Slightly higher hand position for comfort over speed. This will be a follow-up, since I’m stiff and need TLC for my body to relax in the right way.
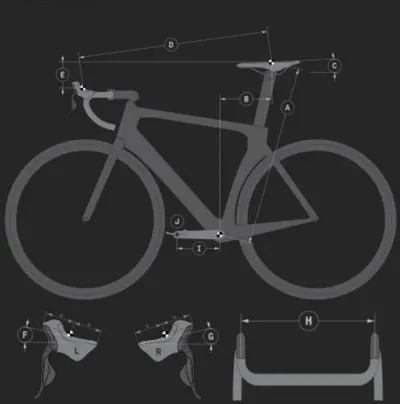
| Measurement | Value | What It Means |
|---|---|---|
| Saddle Height | 735mm | Distance from bottom bracket to saddle top |
| Saddle Setback | 225mm | Position behind bottom bracket |
| Handlebar Width | 380mm | Narrower for slight aero benefit |
| Crank Length | 170mm | Standard for my leg length |
| Lever Drop | +12mm | Hands slightly higher than saddle |
Three hours later, I had numbers. More importantly, I understood why those numbers mattered.
Why Saddle Height Matters for Knee Pain (And What I Was Doing Wrong)
Here’s the science, simplified.
Saddle too low: your knee bends too much at the top of each pedal stroke. That’s excess stress on your patella. Thousands of rotations per ride. Thousands of micro-injuries that can add up.
Saddle too high: your knee hyperextends at the bottom. Your hips rock to compensate. Hello, IT band issues.
The sweet spot is personal. It depends on leg length, flexibility, and riding style. My 735mm saddle height was calculated for my specific biomechanics. I tried internet formulas—they got me close, but the fit session dialed it in.
Bike fitting has three pillars: aerodynamics (reducing drag while maintaining power), comfort (a position you can hold for hours without pain), and power (optimal biomechanics for efficient pedaling). We chased comfort first, then power, then aero.
Some older approaches emphasized sitting back and reaching far forward. Modern thinking says: sit over the pedals. It’s a subtle shift that reduces lower back strain and puts power where it belongs—into the cranks.
I’d been riding my old Giant exactly as it came from the shop. Never adjusted. Mountain bike habits meant I probably rode too low, too bent. At 215 pounds, that meant excess stress on joints that had no margin for error.
And the toe numbness? Three culprits:
- Shoe fit — mine were slightly tight
- Cleat position — putting pressure on nerves
- Pedal spindle — affecting foot alignment
Jason fixed all three. Better-fitting shoes with tailored footbeds. Cleats repositioned. Proper Q-factor on the pedals.
For recreational riders like me, the real gain isn’t watts—it’s comfort that makes you actually want to ride.
First Impressions and the Reality Check
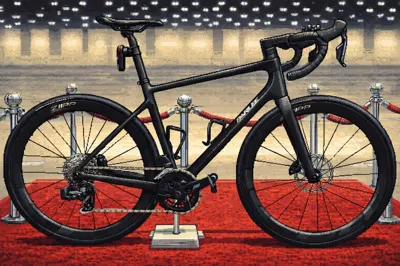
The Parlee arrived right before Christmas. I felt like a kid waiting for x-ray glasses from a comic book ad. You know some expectations won’t come true. It’s still extremely fun to let your mind run wild.
First ride: instant difference.
The acceleration felt noticeably faster. More of my effort went into forward motion instead of being absorbed by the frame.
Feels like switch from average Toyota to souped-up Rivian. Same legs. Different machine.
The handling was livelier too. More immediate steering response. Took some adjustment. I spent the first few miles getting comfortable with how quickly the bike reacted to input.
Then came the reality check.
Over the next few days, I realized I wasn’t ready for the race position Jason had dialed in. My core wasn’t there yet. The aggressive posture that maximizes aerodynamics requires strength I’d let slip. The fit gave me a target; I backed off to match my current fitness.
So I made modifications:
- Moved stem up 30mm — more upright position
- New wider saddle — still prioritizing comfort
- Replaced handlebars — wider for my shoulders
- Added cushioning — gel pads plus thick bar tape
- Shorter stem — 60mm instead of the fitted length
I ride all year. Eighty percent is Zone 2 cardio (easy endurance pace). The race setup is seasonal—reserved for peak fitness periods when I can handle the stress. Comfort is permanent.
Jason’s response when I told him? Professional. Understanding. “Just email me when you’re ready for a follow-up.” No pressure. Good service—though your mileage may vary.
The Gear and The Team
Final setup after modifications:
| Category | Equipment |
|---|---|
| Frame | Parlee Ouray MD, Tier Six build |
| Groupset | SRAM Rival AXS |
| Wheels | Zipp 303S |
| Handlebar | FSA K-Force AGX Carbon |
| Saddle | SMP TRK |
| Shoes | Lake CX302 with MasterFit footbeds |
| Helmet | Giro Aries Spherical |
| Safety | Garmin Varia RTL515 radar |
The Piermont team: Sunny (patient, knowledgeable first contact), Jason (GURU expert, zero pretension), Frank (technical advice, listened to what I actually wanted). They made the process easy. I’m a sample size of one, but my experience was great.
What I’d Tell My Past Self
I used to think bike fit was just for racers. I was wrong.
I spent years thinking discomfort was part of cycling. It wasn’t. One fitting session revealed what seven saddles couldn’t fix. For me, the problem wasn’t the equipment—it was the position.
Here’s what I learned:
- I learned that equipment swaps don’t fix position problems
- I learned that professional fitting isn’t just for racers
- I learned that comfort enables performance, not the other way around
- I learned to fit during low-intensity periods, not before events
- I learned that a fit isn’t permanent—bodies change, preferences evolve
The $8,000 cholesterol-lowering device? Worth every penny. But the $400 fitting session that made it rideable? That was the real investment. And yes, I know how ridiculous that sentence sounds.
Have you ever had a professional bike fit? What was your breakthrough moment? Bonus points if your breakthrough was “my toes returned.” I’d love to hear your experience.